Here's what you need:
1 dowel
 |
| [3/4" diameter] |
 |
| [These are the size I used] |
Recommended tools:
2. Cut dowels & sand
Electric Saw (we used a radial arm saw, but a miter saw or table saw or even hack saw would work)
Drill press
Sander
Clamp
Hammer
Measuring Tape
1. Measure out your dowel, allowing room for saw blade width. I measured mine to be about 2 3/8"
3. Drill holes. We used a 1/8" drill bit. You need the hole to be slightly smaller than the nail so it will fit snug.
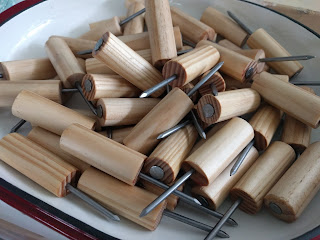
The fun thing about this gift is they are all just a little different. Some of them aren't quite perfectly centered, some are a bit longer or shorter than the others, but they are all handmade and full of character...and hopefully as they're used over the years they'll be full of memories too!
Happy Crafting!
4. Hammer those nails into place.
Once you've got all the nails in and they're all sanded, my grandpa and I dipped them and rubbed them in mineral oil.
I'm kind of loving how they turned out (this is actually three dowels, not one)
Then, if you want to make them super cute...go find some burger baskets (found ours at a local thrift store)...and you've got yourself a darn cute summer gift!
The fun thing about this gift is they are all just a little different. Some of them aren't quite perfectly centered, some are a bit longer or shorter than the others, but they are all handmade and full of character...and hopefully as they're used over the years they'll be full of memories too!
Happy Crafting!
Total Time: 1 hour
Total Cost: $10ish (for one dowel and box of nails)


No comments:
Post a Comment