Wednesday, December 21, 2016

DIY Corn Cob Skewers

My grandparents have a cabin a couple hours from where they live.  It's one of my favorite places on earth and gives me a chance to escape all the hustle & bustle of city life.  I've been going there since before I can remember.  So many memories have been made there.  Anyway, years ago, they got these corn cob skewers from a friend and I've loved them.  They have that rustic, cabin feel.  This year I decided to try and duplicate them...and love how they turned out!


Here's what you need:

1 dowel
[3/4" diameter]
nails

[These are the size I used]


Mineral Oil (optional):


Recommended tools:
Electric Saw (we used a radial arm saw, but a miter saw or table saw or even hack saw would work)
Drill press
Sander
Clamp
Hammer
Measuring Tape

1. Measure out your dowel, allowing room for saw blade width.  I measured mine to be about 2 3/8"


 2. Cut dowels & sand

3. Drill holes.  We used a 1/8" drill bit.  You need the hole to be slightly smaller than the nail so it will fit snug.


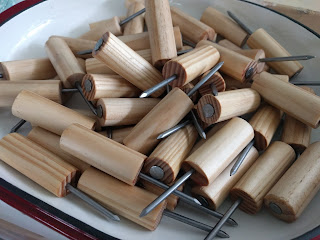
4. Hammer those nails into place.


Once you've got all the nails in and they're all sanded, my grandpa and I dipped them and rubbed them in mineral oil.


I'm kind of loving how they turned out (this is actually three dowels, not one)

Then, if you want to make them super cute...go find some burger baskets (found ours at a local thrift store)...and you've got yourself a darn cute summer gift!


The fun thing about this gift is they are all just a little different.  Some of them aren't quite perfectly centered, some are a bit longer or shorter than the others, but they are all handmade and full of character...and hopefully as they're used over the years they'll be full of memories too!

Happy Crafting!

Total Time: 1 hour
Total Cost: $10ish (for one dowel and box of nails)

Friday, December 16, 2016

Easy DIY Log Candles


Here's another pretty simple gift idea.  If you saw my post about the fireplace log stack, I love how that turned out, and I had a few extra logs I didn't need.  I decided I they were just wide enough to fit a tea votive in.  So, I went to work with my grandpa.

We cut the logs about 3" long, we just eye-balled it.


Then we took the votive and looked at the drill bits (sorry, I can't remember the size) and started drilling.
We clamped it just so it wouldn't move on us...

 Add a candle to each


There you go.  Throw it in a cellophane bag with some extra candles and some crinkly stuff, tie if off and you've got yourself a cute little handmade gift.


Thursday, December 8, 2016

Easy DIY Tic-Tac-Toe

As you might have figured out, my grandpa has a wood shop and I love spending time with him there.  It's fun to take a slab of wood and create something fun along with lasting memories.  Each year I try and make a few gifts for family or friends with him.  A few years ago, I made these boards and they were the easiest thing I've made.  Seriously, a few cuts and some sanding and that's basically it.  And they are cheap too, so I thought I'd share.


What you need:

One (1) 1" x 8" x 8' board
Glass beads (or something to use for the "x"s and "o"s) & letters

[tools]
sander / sand paper
measuring tape
saw (we used a table saw)


1. Grab a 1" x 8" board from Home Depot like this, it's about $10 but you can get 12 boards out of it
2.  Now cut the whole thing down to 1" x 7" 


3.  Now cut 7" squares so they look like this:


4.  Alright now you're going to cut 4 grooves.  We practiced on a scrap piece of wood to get the depth right, 1/8".  We used a table saw, but you could use a hack saw.


These grooves are going to be cut at 2 3/8" & 4 5/8" (or simply 2 3/8" from the outer edges)


5.  Turn your board and make two more cuts/grooves.
6.  Don't forget to sand it, just to smooth it a bit, get all the sharp edges/slivers off


7.  Now for your "x"s and "o"s.  I bought these clear beads from The Dollar Tree and cut out the letters on my Cricut using black vinyl.  The options here are really endless...you could paint them, use marker, use something else completely. 


Now play a couple games ... just for fun:)


Wrap it up


Throw the "x"s and "o"s in a bag or something cute & fun


Then tie it all together with some festive string or ribbon


And there you have it!  Super easy gift, cute and fun for the whole family!  And... super cheap too!  Less than a buck for each one!  I love how these turned out!  And like I said, the possibilities are endless...you could stain the board, paint the board, make different "x"s and "o"s, whatever your little crafting heart desires!

Happy Crafting!

Total Time: 1 hour
Total Cost: $15 ($10 for board, $5 for 5 bags of beads)