Friday, October 28, 2016

2 DIY Festive Spider Webs


 My son had his Halloween party at school this week and I was in charge of games.

I decided I wanted to make a really cute spiderweb for "pin the spider on the web" and went and bought two pieces of black poster board at Walmart for $.97 each.  It was a lot of work, but turned out super super cute.  But I think it's better as a decoration!

Supplies Needed:
1 black sheet poster board
Twine
Scissors & tape
Hole punch


1. I measured 12 stripes about 1" wide and cut them out


(1.b: I "laminated them with packing tape, not necessary but I wanted to make sure it lasted and I'm too cheap to take it to a store).


2.  Then I punched a holes on both ends of them.


3.  I strung the pieces together to form the center of the web.


4.  Next I laid them all out and started making my round pieces.  I tried to use a bowl, but didn't have any really big enough so I just kind of free handed them.

 
5.  Then I punched holes in the ends of the round ones and punched two more sets of holes on the straight ones.
 6.  Time to string again.

There are two ways to do this.  If you don't want your web to be able to collapse, you can string everything together, but if you want to be able to collapse it for storage, then you can just string one end of the round piece to the straight end.

I did NOT string the entire thing together (I wanted to collapse it for storing), so each piece is only connected on one side.


[see how they are only strung on one side?  This allows me to fold it up when I want to store it]

 7.  I taped all the unattached ends with masking tape on the back.


I love the twine knots at the intersections. It's super cute (I think).


It's a little tricky for the spiders to stay on, but it's still super super cute and my son just loves it.  It took a lot of time, but I really like how it turned out!

I didn't know if it would be easy for the kids to keep their spiders attached to this one, so I decided I wanted to make a more simple one...

I saw a really cute "pin the spider on the web" here and thought that was pretty easy so I made my own.  Super super easy & way cute too!  It cost less than $1 and took maybe 20 minutes to make!


Supplies Needed:
1 yard butcher paper
Marker & Ruler
(Plates various sizes)
Tape
Paper spiders (I printed mine from the internet)

I went to Zurcher's and bought a yard of butcher paper for $.67.  They had all sorts of colors, but I decided on green since it's my son's favorite color and kinda Halloween-ey.

I grabbed a yardstick and started making lines.  I did 8 lines 36" long.  Then I measured from the center and marked about every 3".


Then I took my plates and started tracing lines.  I thought about doing freehand, but my ovals always end up lopsided.

 Then I traced them with permanent marker


 There you have it

I decided to laminate mine (about $6) just so I can use it over and over.  And I found my spiders by just googling cute clipart.  I printed them out on cardstock and then "laminated" them with packing tape.

Super fun!

Happy Halloween!

Tuesday, September 27, 2016

DIY Chalkboard Easel


I recently stumbled across the awesome duo of Whitney & Ashley of Shanty2Chic & love all their projects.  They've got great tutorials and such cute style!

I saw this cute easel and decided to make my own!  So much fun you guys, and so easy (with the right tools).  Mine is a little different than the one she made.

What you'll need:
2 8' 2x3 boards
1 set hinges
1 16"x24" chalkboard (you can buy a 2'x4' one at Home Depot and have them cut it into 3 pieces)
12 screws (and drill)
Paint/Stain
Sander

How to:

1. Have Home Depot cut the chalkboard for you, it's a lot faster and easier
2. Cut your boards.  You'll need 4 pieces 30" long and 3 boards 14" long:


Okay, so I caved and bought myself an early birthday present.  I'm so excited about it!  It made this project so.much.easier!  And it's actually really easy to use & small enough I don't need my husband to help me:)  I drilled the pocket holes using this Kreg Jig.  They've also got a bigger one for $140 and a smaller one for $40.  I would highly recommend this tool, I'm already trying to come up with more projects just so I can use this!!!

Back to the instructions:
3.  Drill your holes into the 3 short boards on both ends.  The Kreg Jig makes it super easy to do this...
It does all the work for you really, you pull the blue thing up until you get to the width of your board

Then you drill

and they come out looking great!
I was pretty proud of myself for doing it and I felt like a pro (or maybe just really cool that it looked like a pro did it)

5. Sand all your boards
6. Time to stain/paint/whatever you want.  On my kitchen table we used a grey paint to grey wash it.  We used a pint-size can and we only used half of it on the table.  I did the same color for my easel.  I really love the color of it and I think it goes great with the chalkboard!
Dip the paintbrush in the paint, then in the water, then brush onto the wood.  Let it sit a few seconds, then wipe it off with a damp towel.  Repeat the process until it's as dark as you want it)

It's coming together!

7.  Screw it all together!
These are the screws the kit recommended using.  It's great because it tells you what length of screws to use depending on the width of your board
It comes with a long drill bit to fit into the deep holes, so easy!

And there you have it.
8.  Attach the chalkboard. Whitney used a staple gun to attach hers, we used some screws for ours.  Either way works, just depends on preference really.


9. Time to put the back stand portion together.  I placed my middle board about 6" from the bottom (the chalkboard frame bottom short board is 3" from the bottom).


Once it was screwed together, I placed both parts face down and got ready to add my hinges.  I liked Whitney's idea of painting them black so I did.
These were what the original color was (and you only need one package)

Quick and easy to pain them (just put the screws into some cardboard and spray the tops)


Once they are dry, screw them in place and you're done!


Glad I did the two stands instead of one, much more sturdy and just a more classic look


chalkboard with screws, and those pocket holes...

see how well that jig works?  I mean, don't those holes look so professional ;)


Whitney added a string at the back of hers so it wouldn't open all the way, I will probably do something similar, but for now I am just marveling that I actually built this!

Happy Crafting!

Totals Cost: $17 (not including paint or screws/jig)
Total Time: 4 hours 


Saturday, July 16, 2016

Quick & Cheap Closet Organization

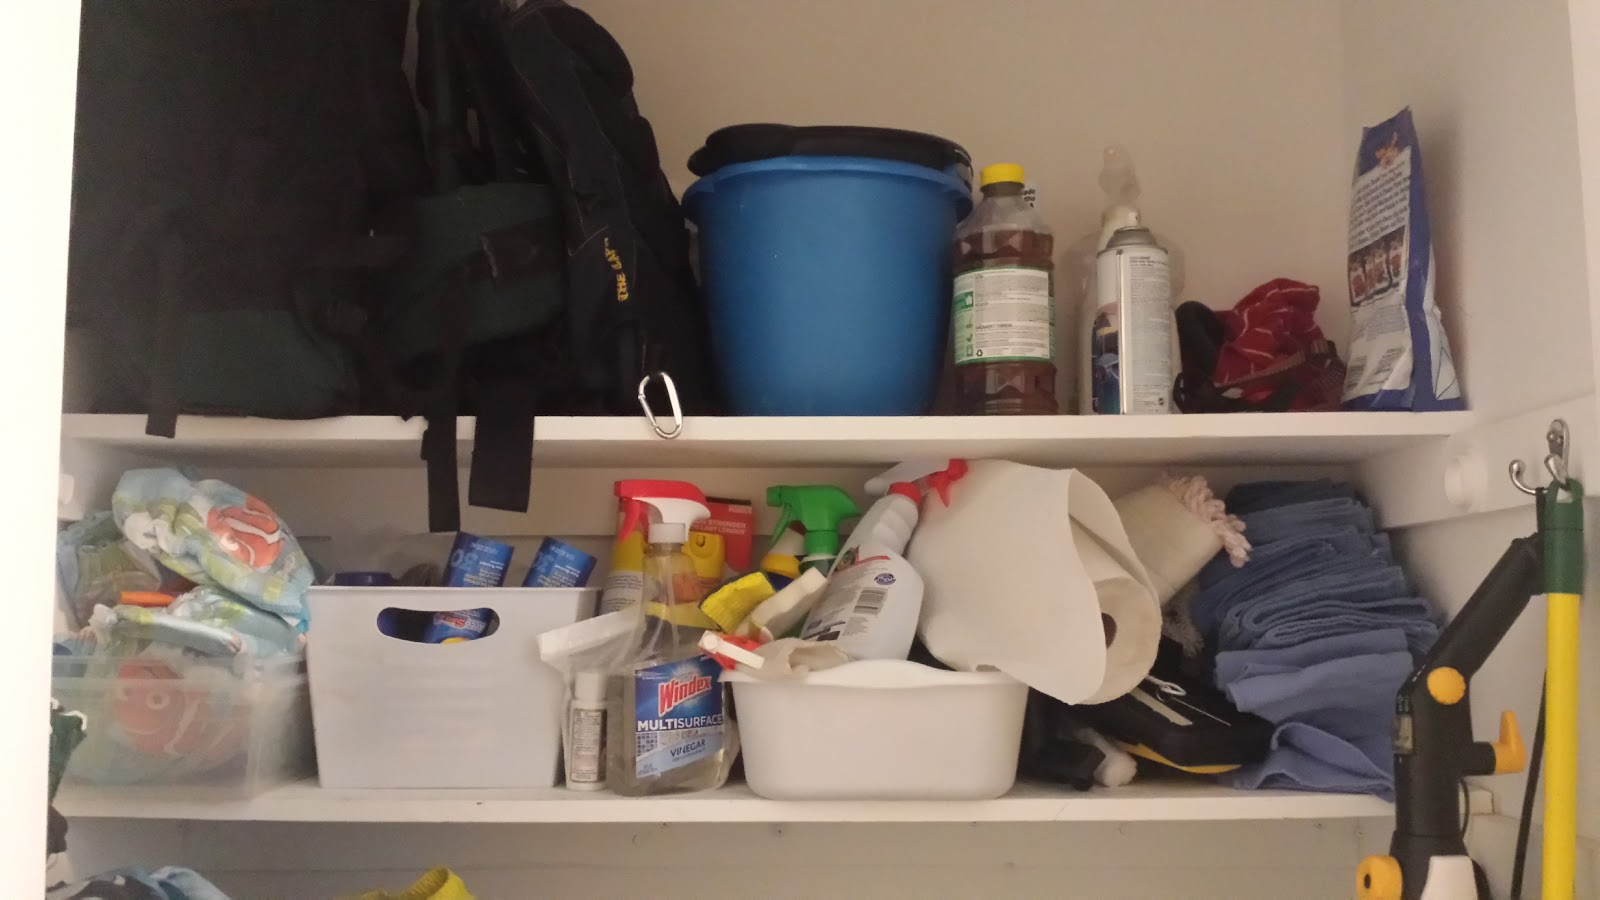
My cleaning closet is a mess!  I've got swim stuff in there, cleaning supplies, dog treats, emergency stuff and a ton of other stuff in there.  I use all of it a lot, so it's nice having the closet right off my kitchen, but it definitely needed some organizing.

As you can see, it's a disaster!

So, I pinned a few things and went to work.  I headed to my nearest dollar store (Dollar Tree) and picked up some of these for under $10.

I liked these because they were more oblong, which I knew would fit better on my shelves.

Then I created some cute tags in Word: 
[aren't they cute?  I love this font (KB Hold the Phone) & the border matches my kitchen colors]
I printed them out on cardstock and "laminated" them using packing tape.  Easy!

I tied them to each basket with some brown twine (super cheap), but you could use decorative/crafting twine too.

Then I put everything in its corresponding basket and voile!  A clean, organized closet!
I feel so much better when things are (a) organized and (b) cute!  It makes me actually want to pull the baskets out and clean something:)
[now everything is in its proper place]

[it still might look a bit cluttered, but it's SOO much better!!]

Happy Crafting!

Total Time: 30 minutes
Total Cost: $9

Friday, May 6, 2016

DIY Magnetic Dry Erase Command Center


I have tried several different things as far as "command center" goes.  The best I've come up with is this 8 week meal plan.  I made it when my husband started working night shifts at the hospital.  It helped us both remember what nights he was working & helped me plan meals I could fix between me getting home from work and him leaving for work.  Now, it still helpful looking ahead and trying to figure out grocery shopping.  I can plan weeks in advance (and as you can see with the smiley face stamps, I've been pretty good at sticking to it).  Less food is wasted, we eat healthier, we eat a larger variety of foods, and we eat as a family.  It's pretty much been a good thing all around.


Anyway, we've kept it on our fridge and it is the best place.  I've got my daily planner just around the corner with other things, but for the most part this meal plan is our go-to.  Well, I decided I wanted to spiff it up a bit and help  lean up the fridge a bit.  So I did.

I went to Ikea and bought this super cute (and cheap) frame....

FISKBO Frame IKEA Can be hung horizontally or vertically to fit in the space available.
And I had these little clothespins (I don't remember where I got them, but the package said $1).  And some mounting tape
Scotch Double-Sided Tape 1in x  50in:

(magnets were not strong enough to hold the entire board)

I originally tried to use tacky glue to attached the magnets to the back of the frame and the clothespins to the front, but it did not stick...grrr...   Then I tried wood glue, then gorilla glue.  Nothing!  GRRR!!  I realized the frame surface was too smooth so I ended up sanding where the clothespins were supposed to go.  As for the magnets.  I wanted the entire board to be magnetic.  It wasn't.  I also wanted it to be dry erase.  It (unofficially) was.  But how to do both.  The plastic insert of the frame worked for the dry erase, but was not magnetic.  After searching and almost an hour at The Home Depot, I ended up with a small piece of sheet metal for $5.  

Everbilt 12 in. x 18 in. 26-Gauge Zinc-Plated Metal Sheet
Luckily I had tin snippers at home so I measured it out and snipped away.  I placed the clear plastic down first (like you would as usual), then instead of a picture, I put the sheet metal, then the cardboard.  Then, I glued (with tacky glue) the magnets to the cardboard.  I used gorilla glue to glue the clothespins to the front of the frame.  And yay, with the sanding, they actually held!  Hallelujah! 


I loved how it turned out...and it was super cheap (although time intensive for trial-and-error). Now we have a place we can both go to for notes, chores, schedule, etc.

Happy Craftin'

Total Cost: $10
Total Time: 4+ hours (because of trial and error)