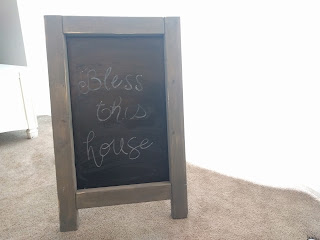
I saw this cute easel and decided to make my own! So much fun you guys, and so easy (with the right tools). Mine is a little different than the one she made.
What you'll need:
2 8' 2x3 boards
1 set hinges
1 16"x24" chalkboard (you can buy a 2'x4' one at Home Depot and have them cut it into 3 pieces)
12 screws (and drill)
Paint/Stain
Sander
How to:
1. Have Home Depot cut the chalkboard for you, it's a lot faster and easier
2. Cut your boards. You'll need 4 pieces 30" long and 3 boards 14" long:
Okay, so I caved and bought myself an early birthday present. I'm so excited about it! It made this project so.much.easier! And it's actually really easy to use & small enough I don't need my husband to help me:) I drilled the pocket holes using this Kreg Jig. They've also got a bigger one for $140 and a smaller one for $40. I would highly recommend this tool, I'm already trying to come up with more projects just so I can use this!!!
Back to the instructions:
3. Drill your holes into the 3 short boards on both ends. The Kreg Jig makes it super easy to do this...
 |
| It does all the work for you really, you pull the blue thing up until you get to the width of your board |
 |
| Then you drill |
 |
| and they come out looking great! |
5. Sand all your boards
6. Time to stain/paint/whatever you want. On my kitchen table we used a grey paint to grey wash it. We used a pint-size can and we only used half of it on the table. I did the same color for my easel. I really love the color of it and I think it goes great with the chalkboard!
 |
| Dip the paintbrush in the paint, then in the water, then brush onto the wood. Let it sit a few seconds, then wipe it off with a damp towel. Repeat the process until it's as dark as you want it) |
 |
| It's coming together! |
 |
| These are the screws the kit recommended using. It's great because it tells you what length of screws to use depending on the width of your board |
 |
| It comes with a long drill bit to fit into the deep holes, so easy! |
And there you have it.
8. Attach the chalkboard. Whitney used a staple gun to attach hers, we used some screws for ours. Either way works, just depends on preference really.
Once it was screwed together, I placed both parts face down and got ready to add my hinges. I liked Whitney's idea of painting them black so I did.
 |
| These were what the original color was (and you only need one package) |
 |
| Quick and easy to pain them (just put the screws into some cardboard and spray the tops) |
Once they are dry, screw them in place and you're done!
 |
 |
| Glad I did the two stands instead of one, much more sturdy and just a more classic look |
 |
| chalkboard with screws, and those pocket holes... |
 |
| see how well that jig works? I mean, don't those holes look so professional ;) |
Whitney added a string at the back of hers so it wouldn't open all the way, I will probably do something similar, but for now I am just marveling that I actually built this!
Happy Crafting!
Totals Cost: $17 (not including paint or screws/jig)
Total Time: 4 hours


No comments:
Post a Comment